These are my notes for getting started quickly with dexterity and zopeskel.dexterity.
Rule Number One: Use Unix
This is about getting started quickly. At this time, Windows will slow you down, do this on a server or something, this issue may change in the future at which point I will be able to recommend otherwise, but for now, for the sake of your sanity just use OS X or Linux for development.
Rule Number Two: Use the Unified Installer
The Unified Installer (usually available at http://plone.org/download) provides all the tools you need to get started, everything here assumes that you have successfully installed Plone via the Unified Installer on your platform.
Rule Number Three:
Install your app and run buildout BEFORE attempting to use localcommands. This is important because additional "goodness" is added to your new package when it is properly installed to your instance.
Step 1 - Install via the UnifiedInstaller then edit the base.cfg and add zopeskel.dexterity and ZopeSkel <= 2.99.
eggs =
PasteScript
ZopeSkel <= 2.99zopeskel.dexterity
Then re-run buildout
bin/buildoutStep 2 - Create your first product
cd src
../bin/zopeskel dexterity my.app
WARNING: localcommands like "addcontent" WILL NOT WORK until you install the app and run buildout!
Step 3 - Install your app by adding it to the buildout.cfg and re-run buildout
Add the following lines to your buildout.cfg
eggs =
my.app
develop =src/my.app
or if you prefer to use mr.developer do something like this:
extensions = mr.developerThe re-run buildout
auto-checkout = my.app
....
[sources]
my.app = fs my.app
bin/buildout
Step 4 - Add your first contenttype
Note that all localcommands are run from within your new app
cd src/my.app
../../bin/paster addcontent dexterity_content
You should now be able to follow the instructions at: http://collective-docs.readthedocs.org/en/latest/content/dexterity.html
If you want to know what localcommands are available try running
../../bin/paster addcontent -lActivate your new Add-on
To see if everything is working launch your instance and visit Site Setup > Add-ons, you should now be able to activate your new add-on.
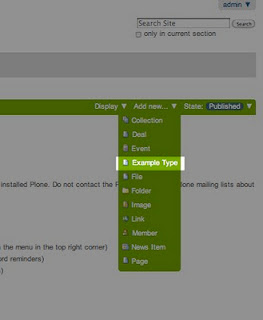
In the screenshot below, I have already created a content type for my add-on, so after activation I can use the green content bar in my site to add a new example type.


1 comment:
Just a note on zopeskel.dexterity. Make sure you specify zopeskel<=2.99
zopeskel 3 is a development branch that is not compatible with zopeskel.dexterity.
Post a Comment